


First, I just used my old crib skirt and cut off the ruffle and left the center so I could re-use it. Otherwise you need to borrow someones and measure the center rectangle and cut your own out. You could use an old sheet or buy some new thin cotton sheet material. To save me money and time I decided I was only going to do three sides because no one will ever see the side against the wall.
Next, I measured my own crib. I measured the distance from the bottom of the mattress to the floor to decide how long to make the skirt. I ended up making mine about 22 inches long. So I cut my main fabric 18 inches wide and I doubled the length of the side of the rectangle because I want it to have a gathered look. I used four different fabrics total and added various lengths my yellow fabric below to get the total 22 inches.

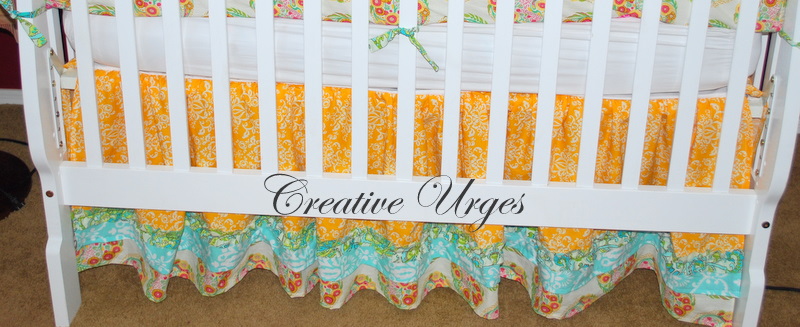
Below you can see the different layers I used. For all the layers I hemmed all the edges under before sewing them to each other. I sewed the yellow and the blue together and added the blue/green ruffle to the top of where they joined. But before I sewed the ruffle on top I sewed the bottom fabric (the one with pink flowers on it) to the same spot underneath where the blue and yellow meet. Does that make sense?! I wanted them to all have the same seam line so I could cover in up in one shot with the ruffle.


Below you can see how I made the ruffle. I actually left the edges on both sides of it raw, meaning they are cut and not hemmed under or anything. Makes it really easy that way and I like that old fashioned handmade look. To learn how to make this ruffle easily on your machine go HERE.

Below you can see that next I gathered the top edge of the yellow fabric and made it gathered enough to fit to the edge of the crib rectangle. To learn how to do this go to my ruffly romper tutorial HERE and I show how to gather and pin fabric together.

Below you can see how much I gathered it to fit the rectangle edge. Then I pinned the right sides together, also shown below, and then sewed them together.

Next finish the two shorter sides the same way you just made the longer one. Once you flip your fabric back over after sewing right sides together, it should look something like below. Obviously if you want to make a simple bed skirt you can choose one fabric and just make it longer to meet you measurements. But look how cute it is with all the extra work!


Tomorrow-bumper tutorial.


10 comments:
Soooo CUTE! Great job!!
I love the fabric in this Jacque. Where'd you find it?
Nice work on the blog post! Really appreciate that big time! Keep up the good work on the blog!
Cupcake Ideas
That's just beautiful ... I love your fabric choices!
Fergie - such fabulous color choices and the ruffles are darling! Fantastic job. Thanks so much for linking to the Sunday Showcase - I greatly appreciate it. I have featured this today. Hope you are enjoying your week ~ Stephanie Lynn
www.bystephanielynn.com
Super cute! Love the mix of pretty fabrics
What a cute idea! So glad I found your blog! My sister and I have a crafting blog as well. If you'd ever like to come over and be featured on our Tute-Sweet Tuesdays- just give us a holler! We'd LOVE to have you!!
a&r
trulie-scrumptious.blogspot.com
That's just so cute... I love your fabric choices!
cribs for twins
Thanks for the tutorial! I'd like to do this but since I'm new at sewing, I'd like to do one print with probably a 2 inch bottom strip of solid. I'm having to order my fabric online but have no idea how much to order. How many yards of fabric did you use (just the patterned part....I can use an old sheet for the underneath part.
Thanks :)
Post a Comment