Craft Cook Sew Decorate Image Map

Tuesday, July 27, 2010

Some fun ideas...


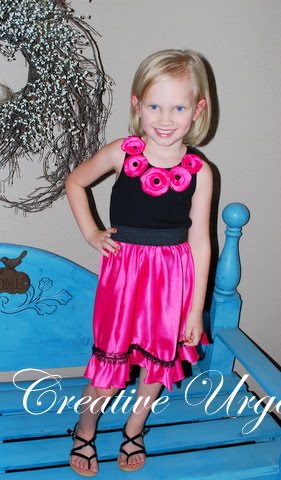
One of my great friends from high school, is a fellow crafter.  I'm always asking her to take pictures of her stuff so I can share them with everyone.  My favorite thing in her house is her cute entry dresser that she decks out with all the seasons and holidays decor.  I need to go take pictures because it always makes me want to go home and make my entry cuter.  Anyways, her name is Kimmy and here are some of her latest creations she has sent at my request.  Above are some fun ideas for clips.  Below are some of her tanks she has made.


I love these two below.  She first gathered the material on the sides and then sewed them on top of the tank tops.
These are the cutest paper pinwheels I've ever seen!  She used these to decorate for her daughter's "tea party."


I know you've all seen extravagant birthday parties with tables filled with matching candies, cakes, food, party favors and decorations.  I always think it's so cute and fun, but think to myself, "no child would truly appreciate all that went into that."  But my hat goes off to all who spend the time to make such creations, and I know it's fun to make such a splendor.  I always love it until about half way through and wish someone could come in and finish it up, ha.
Well, I think Kimmy's party for her daughter turned out so cute and would take some time, but is definitely do-able.  I love her simple but cute party favor bags she made for each girl below.
Here is her "tea party" table below perfect for 9 yr old girls. 
If you look close you can see the flower cut pb&j sandwiches on the cake platter. And the scallop edged paper place mats, and fruit kabobs are so cute and creative.  I'm sure they all loved it!
Are you ready to see the craziest, cutest, and over the top pirate party you've ever seen?  Click here and be amazed!


Friday, July 23, 2010

Bathroom Before and After...

I painted and decorated my friends bathroom for her and I'm finally  posting about it.  Her walls were already a light tan and I first measured with a level and taped stripes about 15 inches apart.
I left the tan and added a turquoise color for the other stripe.  It's actually the same color I used in my Craft Room.


I didn't get a picture of the actually glazing of the walls, but I'm going to do a post on that really soon.  I ragged Ralph Lauren "Smoke" antique glaze all over the walls and heavily in all the corners and edges.  Next, I took my friend Ashley to my favorite place, Hobby Lobby.  We loaded up her basket with so many fun things, and the best part was that almost everything was half off. 


I also convinced her husband to change out the light fixture. Seriously, it changed the whole look of the bathroom.  I love the cute leopard lamp that adds a warmth and homey (?) feel to the bathroom.

I have the same house and always wanted to do something fun with the ceiling because of how it arch's up a little, and loved these iron corners. They add fun and uniqueness to this little powder bathroom.


I love her gold ornate mirror that she already had that was just nailed right above the existing mirror.  We were so excited when we found the blue and black chandelier plate below.  It went so well with all the colors we had.
Hobby Lobby has so many fun iron pieces that you can use to add height and depth.  We screwed this cute scrolly iron piece to the wall above two tin pictures of vintage bath tubs.  It helped  fill in the space and made it fell like one big piece of art.
My favorite part of this bathroom was the wall above with the three different frames of vintage furniture.  We got such a good deal on those from the clearance section.  They were about ten dollars each and add so much character.  We added a shelf below with a plant to give it some warmth which was in a cute turquoise pot.  We found those cute square frames and added ribbon of various lengths that hung on the knobs of the shelf.
We even changed out the old toilet paper roll for this fun iron one which was $4.  Seriously, I need to buy stock in Hobby Lobby because it is such a gold mine to me. 

Thursday, July 15, 2010

Swimsuit Cover-up made a little sassier...

I needed a gift for one of my Sister in Laws and found this cute mustard cover-up and thought it would be fun to embellish.  So I called her up and asked her the color of her favorite swimsuit and she said red.  I'm so glad it was red because I love red and yellow together.
I first cut a 6 inch wide piece of lace into two layers and gathered them together.
Then I sewed it onto the front of the cover up and made three red fabric roses.  Also, I cut off the ties because I thought they would just be annoying and they aren't needed.  I hand sewed the roses on top of the lace and it was done!
I love my dress form so I can display things without always having to be in the picture :).

Wednesday, July 14, 2010

Become a Facebook Follower to win this Give Away...

My facebook followers have reached the 200 mark and I'm thanking them by this Give Away.  If you want to win these clips you need to be a facebook follower by clicking the Like button on the left of this post. Then leave your name and comment on my Creative Urges Facebook Page.  I'll pick the winner next week.

Monday, July 12, 2010

Pillow Ideas and Washable Ottoman Slipcover...

I've been wanting to get my pillows done so badly, because I knew that they would tie my whole family room and kitchen window treatments together.
This is just going to be a simple tutorial.  I first cut out the back of the pillow from some muslin that I had.  Then I cut  two strips of my floral and I made the lace middle by gathering both sides and sewing it to some muslin.
Then I sewed all three pieces together.

Then I pinned some fringe in between both the muslin back and the piece above with right sides together.  The fringe edge should be facing inward and should be sandwiched between the fabric.
I sewed all four corners and left a six inch opening so that I  could turn it back right sides out like below.
I stuffed it with poly -fil and then hand stitched the opening shut.

For the center I made a fabric rose with the leopard print I used in my window treatments.  I gathered some satin red material and used it to frame around the leopard rose.

Below I sewed the gold damask and leopard print first and added the rope like I did the fringe above.  I hot glued the turquoise lace flowers I made by gathering the lace.  I also hot glued the side fringe.  In the centers of the lace flowers I burned some red satin, twisted it at the center and sewed it in place.


I've always hated how this couch was over powering with massive redness and wanted to break it up somehow.  So I slip covered the top of the ottoman.
This picture below is after the fact but if you look at it, I just pinned all the edges and then surged it all over.
It's really just a fitted sheet because I added thin elastic to the bottom so that it would fit snug around it.
If you pull the elastic while your sewing it onto your fabric it will give it that snug fit.  My favorite thing about it is that it comes right off and can go into the washing machine.  That's a must with my two little ones.
You can see both window treatments below and how the pillows help to tie it all together.  I plan on make another big pillow for the other corner and a couple medium sized ones to throw here and there.

Friday, July 9, 2010

Sinful Strawberry Shortcake...

This is definitely a special occasion recipe.  I renamed it "Sinful" Strawberry Shortcake because you  know when something tastes this good that it has to be bad, right?  It's so delicious and is perfect for any special occasion such as a baby shower, bridal shower, birthday, anniversary, or even a bbq. We had this at my Sister In Law's birthday and you can find the recipe from Paula Dean HERE.

Monday, July 5, 2010

Tank Top Dress Tutorial...

So, I first made the pink skirt by cutting an old skirt of mine and adding the elastic band at the top.  Then I used a black tank top that I had and I first tried it on Tori to see how much of the tank to cut off.  I marked it with a pin where I wanted to join the tank top to the skirt and then cut off a couple inches below that.
If you click on "elastic band" above you will see how to pin the elastic and then while sewing you will stretch and pull as you are sewing it to the tank top.  That's what I did after pinning the tank top all the way around to the elastic.


It's really simple actually and so cheap if you can find an old skirt you don't wear anymore.  I love these tank tops from Wal-Mart and they are only $3.
After I cut the pink skirt and made it smaller, I had some scraps of fabric leftover.  I used them to make petals for the top of the dress. To learn how to make these satin roses go HERE.

I then hand stitched them along with black crystally buttons to the tank top.
I LOVE how it turned out.  And here's my little model to show it off, ha.