Craft Cook Sew Decorate Image Map
Showing posts with label women's clothing ideas. Show all posts

Wednesday, August 11, 2010

Summer Dress For Me...


I bought this dress at Target for $6 and wanted to dress it up a little.
So I cut off an 8 inch strip of this black lace that I had.
Then I gathered it down the center.
Then I folded it in half and sewed an end together at a slight angle.

This is what it looked like with one end sewn together.  Then I pinned it to the front and sewed along the top and down the middle.
Then I added this square gold button and it's done!


For my Sister In Law...

My cute sister in law Katie is prego so I snazzled up this prego shirt for her.

I made her a bobby pin to match.  The green roses below are one clip.  I thought I'd try putting two together.

Thursday, July 15, 2010

Swimsuit Cover-up made a little sassier...

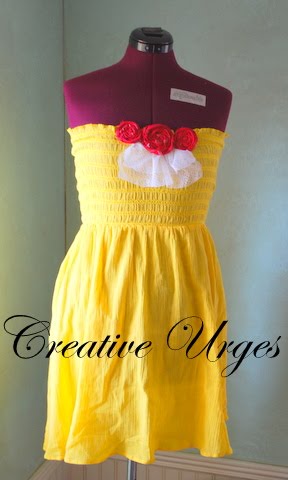
I needed a gift for one of my Sister in Laws and found this cute mustard cover-up and thought it would be fun to embellish.  So I called her up and asked her the color of her favorite swimsuit and she said red.  I'm so glad it was red because I love red and yellow together.
I first cut a 6 inch wide piece of lace into two layers and gathered them together.
Then I sewed it onto the front of the cover up and made three red fabric roses.  Also, I cut off the ties because I thought they would just be annoying and they aren't needed.  I hand sewed the roses on top of the lace and it was done!
I love my dress form so I can display things without always having to be in the picture :).

Thursday, June 24, 2010

"Over the top" embellishing ladies shirt...

I know this shirt to some will seem very obnoxious, but I love it.
I started out by making three ruffles with this small check material.
Then I sewed them on by layering them on top of each other a little bit.
After I was finished with the  ruffles I attached an old purple necklace to the sides of the ruffle.  I used the extra strong thread to keep it in place.
I hid it under the ruffle.  I wash all of my handmade clothes on the hand wash cycle so that things like this won't get ruined.
Then I attached a fabric rose I had lying around and some more of my grandma's clip on earrings.
A little "over the top"?  Yes, but so am I sometimes :).

Wednesday, June 23, 2010

Ladies Shirt Embellishing...I love green.

I finally got around to embellishing the shirts I bought a while back.  Kelly Green is one of my favorite colors.  I went through a bag of clothes that I was going to donate and took out this shirt because I thought I could use the satin polka dot tie.
I snipped it off...
and tied it into a bow.  As you can see below the cut end doesn't match the finished end.  So I tucked it inside itself and sewed along the edge.  I also sewed along the edge of the other side to make them match.
Then I carefully attached the bow by sewing it in place here and there in places that wouldn't be noticeable.
I took one of my grandma's old clip on earings and attached it to the middle of the bow.
I love my new shirt!

Thursday, May 20, 2010

Scrap-tacular---How to Embellish Women's Shirt...


 I've been feeling a little left out making my girls cute things constantly, and so I decided to buy a bunch of plain T's and dress them up with my "scraps."
I have 3 bins full of scraps that I use all the time.
I bought this shirt in grey and 3 other colors from JC Penney's.  I love how they fit and they're only $6.
These are the scraps I chose to work with.
This grey damask strip was about a foot long and I took it and stitched a line around the outer edge all the way around it.
Then I just folded and pinned back and forth like this.
Next, I just sewed straight down the middle of it.  Then I made the flower below, and I learned how HERE.  I was seriously dying when I saw this tutorial.  It's genius and so gorgeous!
Oh, the possibilities this flower design brings me :).  Anyways, I pinned it on the shirt and it looked like a little too much so decided to make a much smaller one with the color below.  Once you look at the tutorial you'll know why that strip looks the way it does.
I added a cute button and hand stitched it on and the result is Scrap-tacular, don't you think?
(sorry for the cheesiness, ha ha.)

Saturday, April 24, 2010

LDS Temple skirt and cardigan idea...

If you are LDS and would love to have a new temple dress/skirt for under $20 then keep reading. If your not LDS and are wondering what the heck a temple dress is then keep reading too :). In our religion we attend Temples to worship God and to fulfill his sacred work. We have an all white dress code once we are inside. So this can also be used as a way to vamp up a cardigan. The dress I usually wear is seriously two sizes too big. The chest is probably four times too big, ha, so I really wanted something new, comfy, and affordable. I first purchased a yard and a half of this white fabric from JoAnns which was on sale for $5 a yd. Then you can take a skirt you already have and lay in on top of your material which should be folded in half in the right direction. From there you can cut around the skirt leaving 1 inch on each side for the seam. I just held mine up to my body and left about 3 inches extra on each side of my hips and then cut a slant downward towards the bottoms of the material. But the slant is very slight as seen in the above picture. Next, pin your fabric wrong sides together and sew the sides together.
I usually like to use my surger to bind the edges together but didn't feel like changing out my black thread to white. So if you don't have a surger use pinking scissors to leave a crinkled cut edge which stops the material from fraying. (I had to google for 20 minutes to find out that those scissors are called "pinking" scissors-sheesh!)

I then took my dress slip that I used for my other dress and cut off the top of it leaving the overall length of it a little shorter than my skirts length. If you don't have a slip then you can use a white liner and do the exact same thing to it as you just did above. Next turn your slip or finished liner inside out and put it over your skirt material that is inside out. Line the tops together, pin, and sew the top edges together. After that, I turned the skirt inside out and turned over about 1 inch and sewed it around the entire top of the skirt leaving a 2 inch opening to insert the elastic. Then you take a safety pin and pin it to one of the ends of your elastic. Next push it through and opening and use the safety pin which is inside your skirt now and push and keep stretching the now gathered edge until you meet up to the two inch opening again. Cut your elastic to your desired waist length and then sew the edges together. Then close up your two inch opening.
Next, try on your skirt and place a pin on the bottom where you want your hem line of your skirt to be. Then when you take it off you can pin the rest. I was lazy and just used the pinking scissors to cut the bottom edge so I wouldn't have to fold it over twice before sewing the bottom hem line. Your skirt should now be complete. If this is confusing for some of you, at your request, I'll do a more extensive tutorial :).

Next, I used the scraps and made these fabric roses and then hand sewed them onto the cardigan. I got this cardigan at Walmart for under $13. I also added a couple to my white slippers that I have. The tutorial for these roses will be posted next week.


And here is the finished project.