Craft Cook Sew Decorate Image Map

Monday, July 5, 2010

Dad's Tea Towel Blanket...

For Father's Day I made my Dad a blanket.  He had saved tea towels from his mission that he went on for our church to New Zealand.  These tea towels were so fun.  They have a lot animated pictures and information about the New Zealand people.  I thought he would appreciate the blanket since he's kept them since he was 21 years old, ha.
So I arranged two rows of three and sewed them together and then joined the two rows to make one big blanket.  I used premade red quilting fabric for the other side.
This was my first time tying a blanket and I found it was a little time consuming, but it was worth it.

Love you Dad!

Thursday, July 1, 2010

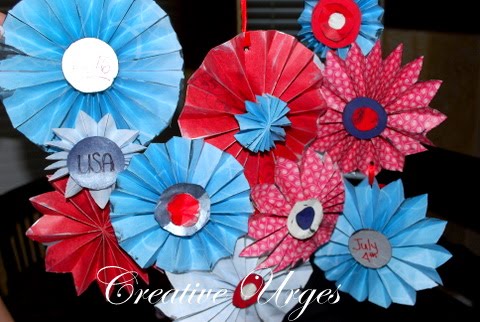
Patriotic Paper Pinwheels DiY...

I was looking for fun craft ideas on Martha Stewart and saw these paper pinwheels.  I always wanted to do them, but when I saw how cute they were at my friends house the other day, I decided to give it a try.  Martha tells you how HERE.
I thought it was pretty confusing at first so hopefully by looking at their template and my pictures you can do it easily.  And I'm looking forward to making these for all different occasions.
So after you look at the template from Martha Stewart your paper should look like below.
Then fold it all together and to get a pointed edge cut off the edges at an angle on both sides.
Then staple the piece right in the middle.
You can glue and clamp the edges together to make a circle, but I just taped them.
To make them come alive brush the edges with white or black.
Then hopefully you have a bunch of crafting crap like me, and can use that to make the middles look good :).

I hung mine from my kitchen chandelier with ribbon and looped them and glued them together. 
Happy Pinwheeling!

Wednesday, June 30, 2010

Another Cute Little Tank Top Idea..

I've been on vacation and it's been hard to get back into the swing of things, so I've been a little lazy about posting.  Remember This shirt?  I used the other tie to make Taylor a tank top.

I just went to L.A. to the fashion district and had so much fun looking at fabric and trimmings galore.  I have a bunch of fun stuff to make things with, can't wait.  This is some stretchy lace I picked up, and I cut off about 6 inches of it and gathered it at one end.
Then I used the tie from the shirt I made earlier, and pinned it on top of the lace.  And it's done.
Don't you just love the diaper hanging out?!

Thursday, June 24, 2010

"Over the top" embellishing ladies shirt...

I know this shirt to some will seem very obnoxious, but I love it.
I started out by making three ruffles with this small check material.
Then I sewed them on by layering them on top of each other a little bit.
After I was finished with the  ruffles I attached an old purple necklace to the sides of the ruffle.  I used the extra strong thread to keep it in place.
I hid it under the ruffle.  I wash all of my handmade clothes on the hand wash cycle so that things like this won't get ruined.
Then I attached a fabric rose I had lying around and some more of my grandma's clip on earrings.
A little "over the top"?  Yes, but so am I sometimes :).

Wednesday, June 23, 2010

Ladies Shirt Embellishing...I love green.

I finally got around to embellishing the shirts I bought a while back.  Kelly Green is one of my favorite colors.  I went through a bag of clothes that I was going to donate and took out this shirt because I thought I could use the satin polka dot tie.
I snipped it off...
and tied it into a bow.  As you can see below the cut end doesn't match the finished end.  So I tucked it inside itself and sewed along the edge.  I also sewed along the edge of the other side to make them match.
Then I carefully attached the bow by sewing it in place here and there in places that wouldn't be noticeable.
I took one of my grandma's old clip on earings and attached it to the middle of the bow.
I love my new shirt!

Tuesday, June 22, 2010

And the winner is...


      Mimi-Jaime you are the winner of my custom pillow!
Please leave me your contact information by emailing me at jacque79@gmail.com.  Thanks to everyone who participated!  I picked the winner by using random.org but when I tried to publish it, it showed everything but the number it picked.  I'll have to figure out what I'm doing wrong for next time but it picked #1. :)

Monday, June 21, 2010

4th of July Cupcakes...

When I saw these I thought they were little pies!  Can you believe these are actually cupcakes?!  I'm totally going to make these for our 4th of July Shindig.  Check out how at MommyTopics.com.

Sunday, June 20, 2010

Ladies skirt to a little girls summer dress...


I've had this skirt for a while but the zipper broke and it's too big, but I just loved the pattern so I never got rid of it.  I decided to make into a summer dress for Tori.  I've made this same type of dress just by cutting two pieces of fabric from the store the same way.  So I first layed one of her dresses on top of the skirt and ended up cutting off about 4 inches on each side of the skirt.  Then I put right sides together and sewed the side seams.
After turning it back right side out I cut of pieces like below on each side for her arms.

Then I cut the back a couple inches lower than the front.


Then I hemmed all the edges all around the front and back.
Below is the back of the dress and I sewed one edge of a piece of elastic to it.
Make sure that your elastic is far enough down by testing it and folding over the edge to see if you can cover the elastic. (Hence pic below)
Below you can see how the elastic is attached and I pulled it out to the side.
Next I pinned and hemmed after I folded the fabric over the elastic.

After I did that I attached a safetly pin to the edge of the elastic.
Then I put the safety pin back through the opening and use it to push and pull the elastic along to the other side.
Then I sewed the elastic on that side and snipped off the extra.
Next I took ribbon and sewed it to the inside front of the dress.

I wanted a criss cross back so I crossed it and sew it to the back of the dress.  The straps were actually too long so I had to take them off, shorten them, and then re-attach them.  Also I had to make a few adjustments in the front by hemming the sides in a little more for a better fit.  It's all really easy, but just know you'll be adjusting here and there for a perfect fit.
It turned out so cute.  The back has a cute elastic back that holds up really good.